So here we are, merrily developing a 2d point and click adventure game.
That’s all great, but how do you develop such a game? What do you actually make? And where do you start designing?
In this post, we’ll go into the essential bit of designing and building a game engine.
The game engine offers the building blocks and mechanics for the game to be built with. It takes care of things such as drawing everything on the screen, making sounds, handling user input, etc. The following quote describes the concept pretty well:
“Generally though, the concept of a game engine is fairly simple: it exists to abstract the (sometime platform-dependent) details of doing common game-related tasks, like rendering, physics, and input, so that developers (artists, designers, scripters and, yes, even other programmers) can focus on the details that make their games unique.” (www.gamecareerguide.com)
So it is important to separate the code & data of the game itself as much as possible from the game engine. Since there can be a fuzzy line between the game and the game engine, we like to show you how we’ve dealt with this by starting out with a general picture of the main components that are involved.
The following illustration of our overall design demonstrates this separation:
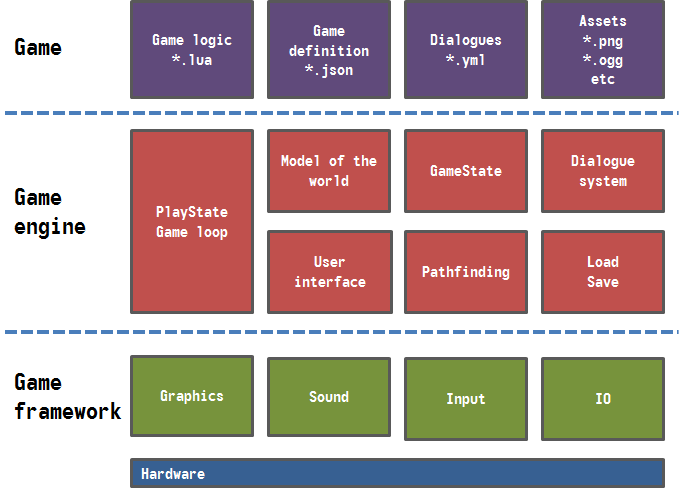
As you can see the architecture is made up of three separate layers:
Game
The game is defined in several files: script files that handle the game logic, directly interacting with the game engine; files that represent the game assets such as sprites, background images, sound files and dialogue files, and finally, files that store the definition of the game, e.g. what objects should be placed in what room (see further on).
In future posts we will get in to the details of these formats and how they make up our game.
Game engine
The game engine is responsible for loading the game definitions, for visualizing and building the game world, and interpreting the game logic – defined in the script files – to enable the game’s dynamics and interactivity. Furthermore the game engine handles the animation, pathfinding and state of the game, and finally is responsible for updating the ‘model of the world’. More on that later in this post.
Future posts will cover the details of interaction, animation, pathfinding and other similar topics.
Game framework
The game framework is the layer that interacts with the hardware and the operating system. It is responsible for the actual drawing on the screen, for reading and writing files, for handling mouse, touch and keyboard input, and for the actual play-out of sounds. We don’t implement this part ourselves, because many good frameworks exist and not a lot of extra control (or fun) is gained by building this ourselves.
In a later post about our ‘tech stack’ we will explain which framework we use and why.
Game loop
An important part of the game engine is the game loop. The game loop is a method that is called every frame, which handles: all input, how the game world is updated and how everything is drawn on the screen.
This illustration gives an impression of our game loop and the objects from the ‘model of the world’ it will use:
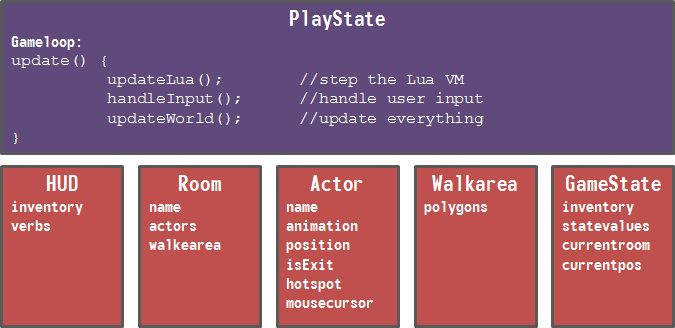
The illustration is of course a simplification, but it should give you an idea of how the game engine works.
The PlayState is the state of the engine where all the gameplay takes place. Not shown in the illustration, there is also a MenuState which handles everything related to the main menu, which includes options for loading, saving and user settings.
The game loop is called every frame and does the following:
- updateLua() This is a method that is responsible to step 1 frame in the game logic virtual machine. It will step through the Lua code for 1 frame. We will get into details of how Lua works in a future post.
- handleInput() Here all the user input is handled. Mouse input, touch input, keyboard input. Did the player click somewhere on the screen? Was it somewhere in the ‘world’ or maybe on the ‘HUD’?
- updateWorld() This will update the model of the world according to its state and it takes the player input into account. It will update all the ‘actors’ and step all animations for 1 frame.
Model of the world
The illustration shows several objects that make up the world. Again it is a bit simplified, but good enough to give you an idea.
Every ‘scene’ you can go to in the game is called a ‘Room’. A Room can fit on the screen, but can also be several screens wide. As soon as you step into an ‘exit’ like a door, you enter a new Room.
Here’s an image that illustrates the various elements that make up the game world:
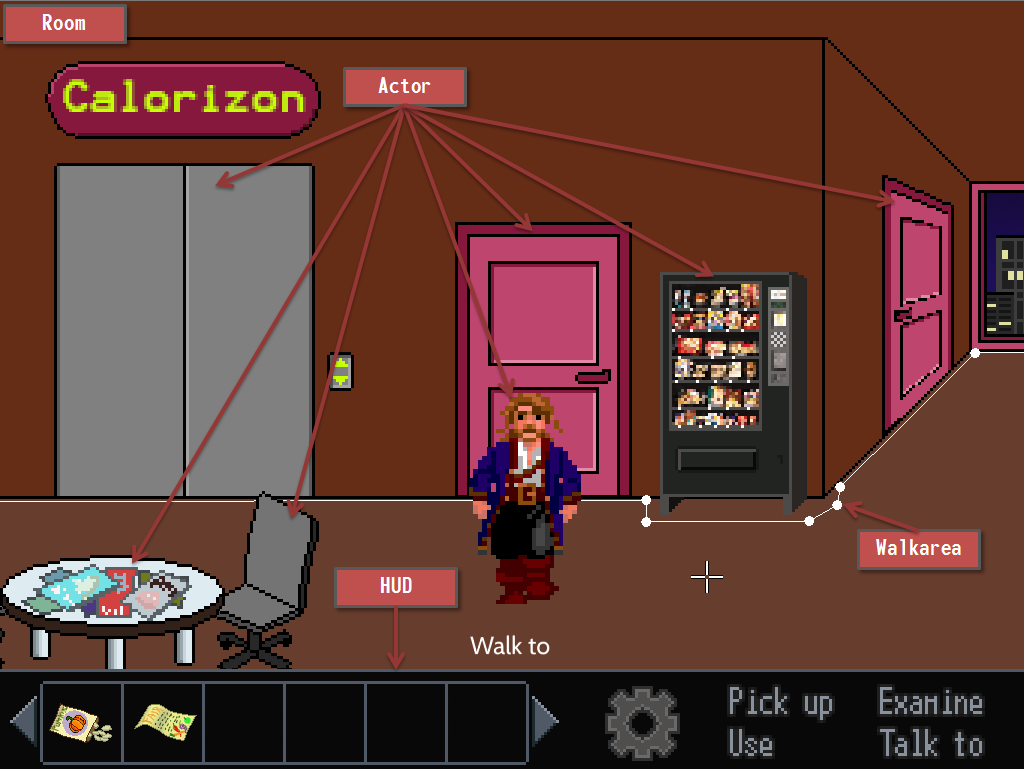
Actors
In this visible part of the Room there are several Actors. Everything that does something in world is an Actor. It can be a character you can talk to, but also a door, or just a plant in the corner.
Depending on the type of Actor it has different properties. An Actor that acts as a door has properties containing the room it goes too, and the position in that room where you enter.
HUD
The HUD (short for head-up display) is the area of the screen that is reserved for interacting with the inventory, clicking the verbs or for clicking the menu button.
The HUD is not part of the game world, but can be seen as a kind of input device or dashboard for the player to interact with the world.
Walk area
The white lines and dots in the image – hidden during gameplay – illustrate the walk area. The walk area is the part of the room where the main character can walk. It is one big polygon, with optional extra polygons to create blocking parts of the area. A pathfinding algorithm ensures that the character takes the shortest route to its destination. More (technical) details on walk area and pathfinding in a future post.
We hope that with this post you’ll get the basic idea of the design of our 2d point and click adventure game engine. There is of course a lot more to say about it and we will make sure to cover this in future posts. By then we’ll really want to dive into the technical details of several parts of the engine.
Our next post will first get into the ‘tech stack’: the chosen programming language, the framework, and all third party libraries.