Finally I have some time to write the follow up post on pathfinding part 1. Back then I went through the basic concepts of how to define the walkable area and the algorithms used to find the shortest path.
In this post I’ll dive in to the details, showing an example I created. Alongside this I’ll show several code snippets taken from our engine code.
The source code is available on Github and you can use it any way you want.
But first my live example (you might need to click inside it to give it focus):
(If this example is not working, you can click here to open it in a new window.)
So, what’s going on here?
The example shows a very simple room, or 2 rooms in fact, because you can switch rooms by pressing 1 or 2. In this room stands our great hero of the game (yeah, crappy programmer art!) and you can move this character by clicking somewhere in the room.
By pressing ‘space’ you can toggle the debug view of the pathfinding algorithm. The blue lines represent the polygon of the walkable area. You cannot leave this area.
The yellow circles are all the points that you need to calculate the path. Those are the concave vertices of the walkable area polygon (see part 1 for the terminology).
The green cricle is the position of the character, or the start point of the path. The red circle is the end point of the path, the destination.
Together, the yellow, green and red circles are the nodes of the graph.
The green lines indicate all straight line connections between all nodes in the graph. Only nodes that are in line of sight ( they can see each other) are connected and are edges in the graph.
The white lines form the shortest path from start to destination.
Ok ok, you probably could see all that yourself, and you probably want to see some source code by now. Patience! My source code needs context.
As you may have read in earlier posts we are building the game using the programming language Haxe and we use Luxe as our game framework. This means all my example code uses Haxe.
Haxe is easily readable when you can read C, C#, Java, Javascript, etc.
Luxe is only used to display all the stuff and handle input.
The pathfinding part of the code is independent of Luxe except for the usage of luxe.Vector class. But that can be replaced by the Vector implementation of your choice.
Allright, enough with the context. Let’s get to work and divide the problem into smaller steps:
- Define the walkable area using a polygon
- Create the graph nodes based on the walkable area polygon and detect concave vertices
- Use line of sight to create graph edge and connect nodes
- Add start and end nodes to the graph and find closest point on edge when needed
- Calculate the shortest path
Defining the walkable area
This is the easy part. Just create the polygon for the walkable area. A polygon is just an array of Vectors representing all the vertices.
In our engine Polygon is a class that contains the array of Vectors and it contains several methods like pointInside() and getClosestPointToEdge(), etc.
Code example:
var polyid:Int = 0;
polygonMap = new PolygonMap(Luxe.screen.width, Luxe.screen.height);
polygonMap.polygons[polyid] = new Polygon();
polygonMap.polygons[polyid].addPoint(5,248);
polygonMap.polygons[polyid].addPoint(235,248);
polygonMap.polygons[polyid].addPoint(252,277);
polygonMap.polygons[polyid].addPoint(214,283);
//etc etc
As you can see in the source code the polygon is created inside another object of the type PolygonMap. A PolygonMap contains the Polygon, or better, the list of Polygons, because you can define multiple polygons to create blocking parts in the walkable area.
The PolygonMap also contains the methods to create the graph from the polygons.
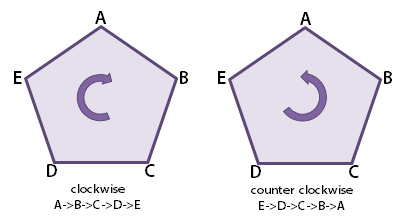
Note: the polygons are always clockwise oriented. This is necessary for finding the concave vertices.
This illustration shows the difference between a clockwise and a counter clockwise oriented polygon.
Creating the graph nodes
Once you have a polygon it’s time to derive a graph from it. The graph is a collection of nodes and edges and is used in the pathfinding algorithm.
I only need the concave vertices from the polygon as nodes in the graph. In the next section of this post I will explain the ‘line of sight’ method to create the graph edge.
First the graph nodes:
mainwalkgraph = new Graph();
var first:Bool = true;
vertices_concave = new Array();
for (polygon in polygons) {
	if (polygon != null && polygon.vertices != null && polygon.vertices.length > 2) {
		for (i in 0...polygon.vertices.length) {
			if (IsVertexConcave(polygon.vertices, i) == first) {
				var index:Int = vertices_concave.length;
				vertices_concave.push(polygon.vertices[i]);
				mainwalkgraph.addNode(new GraphNode(new Vector(polygon.vertices[i].x, polygon.vertices[i].y)));
			}
		}
	}
	first = false;
}
This code example creates a new Graph object first. A Graph object contains a set of Nodes and a set of Edges and some methods for adding, retrieving and cloning. Nothing special really.
Then there is a for-loop that iterates over all polygons (that walkable area polygon and all its ‘holes’/blocking areas). For each polygon it iterates over all vertices and detects whether the the vertex is convex or concave. When it is concave, it will be added to the graph as a node, and to a array of concave vertices which is used later on.
For all polygons which are not the main walkable area, it will add all non-concave vertices to the graph. This is because the non-concave vertices of the blocking areas are pointing ‘inwards’ in the walkable area.
Let’s illustrate this:
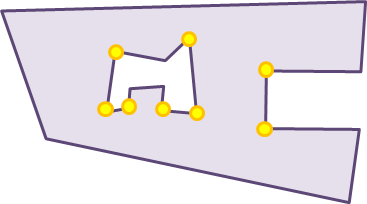
The big purple polygon is the walkable area. It has 2 concave (pointing inward) vertices. Inside this polygon is another polygon: the blocking polygon which has 6 non-concave (convex) vertices. These vertices are not pointing inwards into the small polygon, but are pointing inwards into the walkable area polygon.
These 8 concave vertices together make up the graph.
But how do you calculate whether a vertex is convex or concave?
For this I use a method ‘IsVertexConcave’ which accepts the full sets of vertices of the polygon and the vertex to be tested, as parameters.
This method is a port from a method by David Gouveia from this post on his blog.
The method:
private function IsVertexConcave(vertices:Array , vertex:Int):Bool {
	var current:Vector = vertices[vertex];
	var next:Vector = vertices[(vertex + 1) % vertices.length];
	var previous:Vector = vertices[vertex == 0 ? vertices.length - 1 : vertex - 1];
	var left:Vector = new Vector(current.x - previous.x, current.y - previous.y);
	var right:Vector = new Vector(next.x - current.x, next.y - current.y);
	var cross:Float = (left.x * right.y) - (left.y * right.x);
	return cross < 0;
}
It basically checks the angle of the lines from the previous vertex to the current vertex and from next vertex to the current vertex. This method only works when you have a clockwise oriented polygon.
Creating the graph edges using ‘line of sight’
Allright, now we got an elementary graph: a set of nodes. Let’s connect all the nodes and do some pathfinding!
But wait, how can we be sure here that we can walk from each node to every other node? We have to make sure no lines of the polygons are blocking us. Time for some ‘line of sight’ algorithms.
What we need to do is connect all nodes which are in line of sight. That means no lines part of the polygons can block the view from the node to another node.
The only way to do this is for each node check the line of sight with every other node. A nested loop:
for (c1_index in 0...vertices_concave.length) {
	for (c2_index in 0...vertices_concave.length) {
		var c1 = vertices_concave[c1_index];
		var c2 = vertices_concave[c2_index];
		if (InLineOfSight(c1, c2)) {
			mainwalkgraph.addEdge(new GraphEdge(c1_index, c2_index, Distance(c1, c2)));
		}
	}
}
This nested loop tests all nodes against eachother using the function ‘InLineOfSight()’ and creates an edge in the graph when needed.
Let’s dive into the InLineOfSight function (again ported and adapted from David Gouveia):
private function InLineOfSight(start:Vector, end:Vector) :Bool {
	var epsilon:Float = 0.5;
	// Not in LOS if any of the ends is outside the polygon
	if (!polygons[0].pointInside(start) || !polygons[0].pointInside(end)) {
		return false;
	}

	// In LOS if it's the same start and end location
	if (Vector.Subtract(start, end).length < epsilon) {
		return false;
	}
	// Not in LOS if any edge is intersected by the start-end line segment
	var inSight:Bool = true;
	for (polygon in polygons) {
		for (i in 0...polygon.vertices.length) {
			var v1:Vector = polygon.vertices[i];
			var v2:Vector = polygon.vertices[(i + 1) % polygon.vertices.length];
			if (LineSegmentsCross(start, end, v1, v2)) {
				//In some cases a 'snapped' endpoint is just a little over the line due to rounding errors. So a 0.5 margin is used to tackle those cases.
				if (polygon.distanceToSegment(start.x, start.y, v1.x, v1.y, v2.x, v2.y ) > 0.5 && polygon.distanceToSegment(end.x, end.y, v1.x, v1.y, v2.x, v2.y ) > 0.5) {
					return false;
				}
			}
		}
	}

	// Finally the middle point in the segment determines if in LOS or not
	var v:Vector = Vector.Add(start, end);
	var v2:Vector = new Vector(v.x / 2, v.y / 2);
	var inside:Bool = polygons[0].pointInside(v2);
	for (i in 1...polygons.length) {
		if (polygons[i].pointInside(v2, false)) {
			inside = false;
		}
	}
	return inside;
}
Well, there’s a lot going on here. The function has 2 parameters: start and end which are the vectors of the nodes.
First it will check if one of the node is outside the walkable area (polygon[0]). If so, return false.
If the start node and the end node are (practically) the same node, return false.
Then it will check all lines of all polygons against the line between start and end node. If the lines cross, return false.
There is a little more going on here, but I’m not going into every detail. This should give you an idea of what’s going on. And you can play with the source code of the example.
In the source you can find the implementation of all methods called in the InLineOfSight function, like LineSegmentsCross() and distanceToSegment().
Adding start and end nodes
Now that the edges are added to the graph we are almost ready to find the shortest path. But at the moment we only have the graph of the static walkable area. We need to add the start position of our character and the destination of our character to the graph before we can find the path.
Every time the player clicks on the screen, first a clone of the static graph we created earlier is created. That way we can always start with a fresh graph to add the start and end node to.
Subsequently the start node and end node are added to the graph, which are created from the position of the player and the position of the mouse click.
If the start node is inside the walkable area (not very likely, but rounding errors sometimes cause this), then the closest point on the edge of the walkable area from the start position is calculated. That point will become the start node.
The end node created on the position of the mouse click. If that position is not inside the walkable area, the closest point on the edge of the walkable area is calculated.
An extra check is needed for the end node, because it is possible to click inside one of the other ‘blocking’ polygons. So we have to check for that as well, and if that’s the case, calculate the closest point on the edge of that polygon. That position will be the end node.
But how do you calculate the closest point on the edge of a polygon?
You can find the implementation of that algorithm in the source code in the method getClosestPointOnEdge(), so I’m not going into detail here.
But the basics are:
- Find the closest edge of the polygon (using distanceToSegment())
- Then calculate the point on the edge closest to clicked point
I used this StackOverflow answer for inspiration: http://stackoverflow.com/a/10984080
Well now: we’ve created a cloned graph and added the correct start and end node to it. The last thing we need to do is add new edges to the graph for all nodes that are in line of sight of the start and end node. For that we use the same ‘line of sight’ method I described earlier.
After that, we are finally ready for some pathfinding!
Calculating the shortest path
To calculate the shortest path between two points in a graph we can choose from several pathfinding algorithms. But most commonly used are A* and Dijkstra.
There are so many website that explain these algorithm better than I can do, so I’m not going into them.
If you want to dive into those algorithms, you should read this website. I used the source code from that website and ported it to Haxe. And this website goes into great detail of these algorithms, explaining the way they work and how to implement them.
Source code
You can find all the source code of the example on Github here: https://github.com/MicUurloon/AdventurePathfinding
Advanced stuff
I’ve explained the way we use pathfinding in our engine. But still there are some topics I didn’t cover, like:
- How to scale the character based on the position (close to the camera, vs further away in the distance)
- How do you trigger events based on the position of the player
- How to block and unblock the way, like opening and closing a gate
These are all topics related to pathfinding and walking around with your character. I’ll cover these in future posts.
I hope this blogpost and the example can help you create your own pathfinding method. If you have any questions, please ask them in the comments.
Dear Mr. Uurloon,
thank you very much again! My code is working now two. I had some problem in my own lineOfSight function (snapped point were not accepted…). Your code pointed me do this. Are you planning to write a game or “just” an engine?
If you ever come to germany near Cologne or Bonn, let me know, i owe you some beer (or grok 😉 ) !
Dank u wel,
Sebastian
Great to hear you have your code working now!
That is exactly what this is blog is for. Because being realistic, I doubt we will release a full game any time soon. We are both full time working software engineers with a family, so free time is scarce. And we both are not artists.
So we might not release a game, at least we can publish the knowledge we gathered during development on this blog for others to enjoy and learn from.
thanks for the amazing work, looking forward to the next piece. thinking of porting the whole thing over to c# for a unity-based point’n’click engine i’m working on
I’m glad you find it useful! Of course you are free to port it all. Please mention the original developers in your port as I did in my sourcecode. Which is not me; I just collected other peoples material/sourcecode/techniques and put it all together in something useful for us.
No more updates on this project?
We didn’t have the time to work on this project for a long time. We both have jobs, a familiy en regular jobs, so this project is done in our spare time.
I still want to write blog posts on several topics (like Lua integration and other topics), and maybe we will continue working on this game.
If you have a specific question, or want to know more about a topic, or about how we approached things, please ask.
Looking forward to read answer to “How to scale the character based on the position (close to the camera, vs further away in the distance)”
Maybe I’ll write a short blog post on that topic next week.
The technique we use is that we create an overlay on the level background. That overlay is just a single color covering the walkable area. Every pixel in that overlay can be a little transparent. The ‘alpha’ value of the pixel in that overlay determines how far the actor is, and how much it should scale down or up.
I can explain it more visually in a blog post, but I hope I’ve satisfied your curiosity a little.
Hi Roman, I just published a post about scaling actors: http://www.groebelsloot.com/2017/01/16/scaling-actors
Hope you like it!
Cool 🙂
Hi, I’ve a question. If I’m not using a framework like Luxe, how do I create my own graph object? I understand the part about adding all my concave points to it, but what about the edges, for instance the top horizontal line of the overall room. How do I define and use that? Should it be saved as two sets of coordinates that represent two vertices of the polygon in between which the edge lies? Do I then do it for every single edge of all polygons?
Hi Tim. You should check out the source code of the example used in this post. In the Pathfinding folder are classes for the Graph object, the nodes, and the edges. All these classes do not require Luxe. They are just Haxe classes, and can be easily ported to another language like Java, c#, etc. In fact, I ported these classes from Actionscript 3 (Flash) classes.
A Graph object is basically a collection of Nodes and Edges. Each node is a Vector (x,y), and each Edge has a FromNode and a ToNode, so 2 pointers to Nodes that make up the Edge. The Edge also has a value for the ‘cost’ of traveling the Edge.
We only use Luxe to draw the Graph, but for that you can use any language you prefer.
Does this answer your question?
Hey there! Thanks for the amazing tutorial. I have converted it over to love2d but I am having some strange issues. I am able to create the graph going from the starting point to the convex points and also able to create the points from the convex to the ending point but I can’t get the path to “wrap” around edge segments. You wouldn’t happen to have any idea why this is? I would really appreciate the help please.
This image demonstrates the problem
http://image.prntscr.com/image/4f406addc42a471faaa43fe86b429ec5.png
After messing with it some I believe it has something to do with the InLineOfSight function. If you notice your version draws green lines when on the polygons edge, however mine snaps a little and erases them. Maybe rounding errors in Lua?
http://image.prntscr.com/image/7a0b36102b7b4da8aeac54e9b0d406d0.png
Sorry for the nested replies but just wanted to report I fixed the issue. It was the “toleranceOnOutside” argument in the “PointInside” function. Since Lua has no default argument support because it was a boolean value, my or check was failing overriding the false statements. Will upload as a love2d demo at some point 🙂
I’m glad you fixed your problem!
Was it an easy port to Lua? I ported the code from a C# project, which was pretty easy because of the language similarities.
It took two days to port. Day 1 was converting syntax, day 2 was offsetting all the indices because Lua likes to start arrays at the 1 and not 0 index.
I have a working love2d demo up at
https://github.com/To-mos/love2d-pathfinding-polygon
Again epic tutorial thanks for taking the time to write it! I really learned a ton on the topic after having to go through each piece of code to convert it and dealing with debugging it.
Good job, Thomas, on your love2d port! I see you even applied our latest minor fix in the line-of-sight function (thanks Dom De Re).
Hi, Mic!
I’ve been working on a tool to simplify the creation and storage of these polygons. It’s for my own little engine I’m writing, which isn’t nearly as nice as yours as this point, so I won’t show it off. The tool, however, might be useful to you and some of the people who commented here. Please enjoy:
Tool: http://www.alaric.us/adventure/tools/polygontool
GitHub: github.com/Alaricus/PolygonConstructor
Hi Alaric. That’s a nice polygon editor. Might be very useful to people when creating polygons for pathfinding. So thanks for sharing and releasing it online (even with sourcecode!).
Our own game editor has a very similar polygon editor. Which reminds me that I should do a post on game editors.
Good luck with your own engine!
One feature that may particularly be of interest, is the ability to build inverted polygons, which will have all of their protruding vertices get detected as concave. This eliminates the need to treat the vertices of the “holes” in “walkable” areas differently inside the code, leaving you to only worry about detecting concave vertices on all of your polygons.